Pages

Showing posts with label Tip And Tricks. Show all posts

Monday, October 1, 2012

HOW TO DOWNLOAD TORRENT WITH HELP OF IDM


First You need to follow some few steps for do this .

1. 
In First step you need to download idm software and then install it in your pc .
Now You go to www.zbigz.com website .
3. 
And now copy any torrent file link address .
4. 
Now paste link address in Upload box .
5. Now click on go free button .
That's It guys now you are done .
I hope you enjoyed this tricks

Thursday, July 5, 2012

How to Rename Start Button in XP


You can rename your Windows XP 'start' button through registry or explorer.exe by changing some values. But there is lots of efforts to rename 'start' button through it. 


There is a new and simple way to do that without playing with registry or explorer.exe.

A utility called StartBtn Renamer will do it for you.
just download the utility, type the text( you want to give to the start button) in New Lable section and click on 'Rename It!'. 

Your 'start' button text has been changed. 

Download Software

Thursday, April 19, 2012

How To Share Speaker Between Multiple Computers Over A Network

There are many articles asking you to connect some wires between multiple computers in order to share a single speaker, but you actually don’t have to do it. Share Speaker Player is a cool utility that lets you play music on a speaker connected to any computer through the network. All you have to do is install and run this tool on your computer and the computer to which the speaker is connected.tr
You can start playing music by following two simple steps: add the music you want to play and select the computer on the network where you want it to play. The name of the computer which has this tool running will be automatically shown in the list.
share speaker player
It supports all kind of formats that are available in Windows Media Player and is dead simple to use. No additional network setup needs to be done, everything is automatic. It sits quietly in the system tray and takes very less system resources. Sadly this tool is a shareware and the trial is available for 90 days period only(3 months). Enjoy!

Monday, January 30, 2012

Share Files and Printers between Windows 7 and XP

If you have a home network and are running Windows 7 and have XP on other PC(s) you might want to share files between them. Today we will look at the steps to share files and hardware devices like a printer.


Sharing Files In Windows 7 and XP

Sharing folders between two Windows 7 machines with the new HomeGroup feature is an easy process, but the HomeGroup feature is not compatible with Vista or XP. For this tutorial we are using Windows 7 x64 RC1 and XP Professional SP3 connected through a basic Linksys home wireless router.


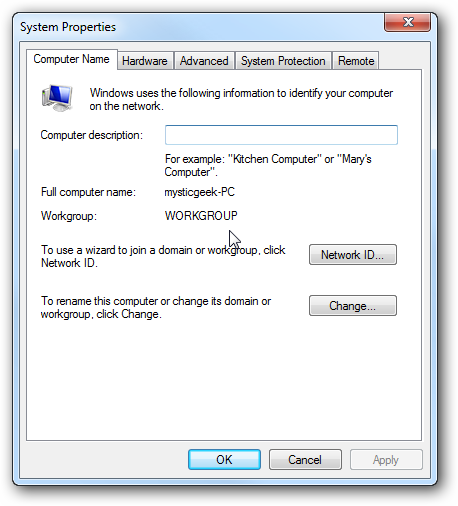
First make sure both machines are members of the same Workgroup which by default is named Workgroup.
workgroup

On the Windows 7 machine go into Control Panel \ All Control Panel Items \ Network and Sharing Center then click on Change advanced sharing settings.


You will want to verify the following settings under Advanced Sharing Settings for the Home or Work and Public profile.

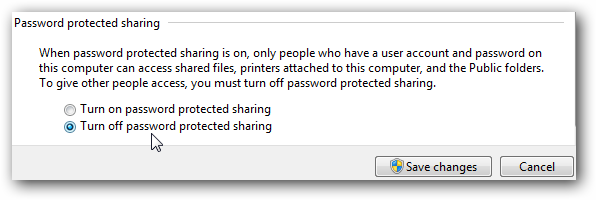
If you want any user to have access the public shares turn off password protection. This is located in Advanced Sharing Settings toward the bottom of the list.


If you want to keep it enabled make sure there is a log in account for the other XP machines and they have a password.


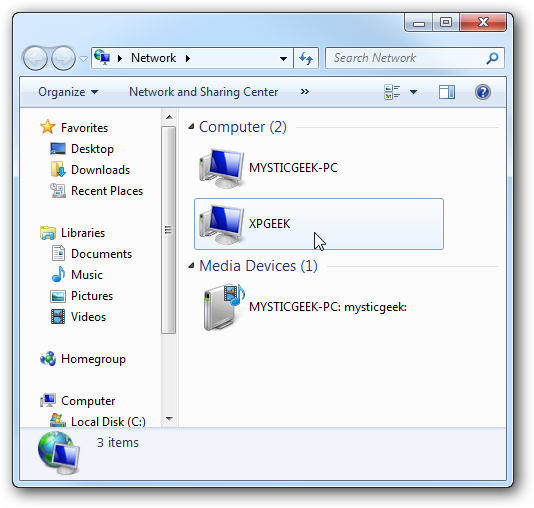
Now if you go into Network in Windows 7 you should see your XP machine and the Windows 7 as well which in this case is Mysticgeek-PC.
To share the printer on the Windows 7 machine go into Devices and Printers from the Start menu and double click on the printer icon.

Next double click on “Customize your printer”.


In the Properties screen click on the Sharing Tab and check the box to share the printer and type in its share name.


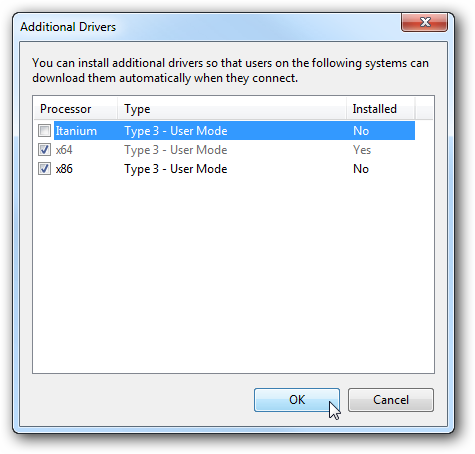
If your XP machine is an x86 OS you can install Additional Drivers before setting up the XP machine.

To find the shared folders and devices double click on the Windows 7 machine icon under Network. Here you can see the printer connected to my Windows 7 machine is shared and also the Users Folder.


Continue into the Users folder and Public to see the shared folders, here I also created a folder called XP Share just to keep everything in central location.

Over on your XP machine open up My Network Places to find the Windows 7 (mysticgeek-pc) shared folder.

Double click on the Share folder to find a list of shared folders in the Public folder on Windows 7. If you have password protection enabled you will need to type in the username and password of the user account on the Windows 7 machine first.

Setup XP With Shared Printer

To set up the shared printer in XP you will need to go into Printers and Faxes from the Start menu and kick off the Add Printer Wizard.

Now select “A network printer, or a printer attached to another computer” then hit Next.
Next select “Connect to this printer…” and type in the path for the printer connected to the Windows 7 machine and click next.
Now click Yes to the confirmation message.


Then click Finish the printer to install and complete the Wizard.

In some cases you will need to install the x86 XP drivers for the shared printer because the Windows 7 drivers are not compatible with XP. When everything is installed open up Printers and Faxes to find the shared printer.

This should help you get started with sharing your files and other devices with your Windows 7 machine. When I first started I was able to see the printer on XP right away because I had a HomeGroup set up, but once I deleted it I needed to share the printer like you would for a workgroup. You might also have to do a couple restarts of the XP machine for it to see the shared resources on Windows 7. If you have had any experiences with sharing between Windows 7 and XP leave us a comment!

Friday, January 20, 2012

How to Apply for a PAN Card Of India Online

How to Apply for a PAN Card Online

Permanent Account Number (PAN) is a ten-digit alphanumeric number, issued in the form of a laminated card, by the Income Tax Department. PAN is required for creating your paypal account. Anyone can apply for a PAN card, whether they are working or not. There is no restriction on age, region or nationality. You can submit an application for an underage minor and even on behalf of a newborn. Applications must be signed by a legal parent or guardian. A typical PAN number looks like AFZPK7190K.


Application for fresh allotment of PAN can be made through Internet. The charges for applying for PAN online is Rs. 94. Payment of application fee can be made through check, demand draft, credit/debit card or net-banking. Once the application and payment is accepted you will see a acknowledgement, you are required to send a proof of Identity & Address along with the acknowledgement to NSDL/UTITSL through courier/post. After they receive your documents, PAN card will be sent to your home.

Follow the steps below to apply for PAN card online:
  1. Go to https://tin.tin.nsdl.com/pan/form49A.html
  2. Scroll down & select "Individual" as the category of applicant.
  3. Fill all the fields which are marked with an asterisk. (Detailed instructions).
  4. To fill area, range code, AO type and number click the Non-International Taxation AO details. Search your city by selecting the correct alphabet & click your city. Now comes the hard part. Read the description and try to find the correct circle for your region. If you're unable to find it or if no description is available, you'll have to take help from your friend/relative who lives in your area and has a pan card. Go to this link and submit your friend/relative's PAN number. You'll get his/hers AO details. Enter the same information in your form.

 Once the application is submitted, you will be shown an acknowledgement page, which will have an Acknowledgement Number along with a summary of your details. It will also list the mode of payment and the documents to be submitted as address and identity proof, as chosen by you. You need to take a print-out of this acknowledgement page and affix a recent Passport-size photograph and sign in the box below using a black pen only. Please retain a copy of the acknowledgement for your reference.
Finally, The acknowledgment duly signed, affixed with photograph along with Demand Draft, if any, and proof of identity & proof of address should be sent to the address given on the acknowledgement page. You may send the documents to NSDL via courier, speed post, etc. Note that the documents must reach them within 15 days from the online application. The PAN card will arrive at your house in about two weeks.
Once you submit the documents, you can track the status of your PAN online via this link.

Thursday, November 17, 2011

Folder options enabled

Trouble:
Are you among those who are not able to access or see your folder options under File Menu>>Tools in Windows Explorer on your Windows XP ? This problem of hidden or disabled folder options occur normally due to malicious virus (w32.rontokbro@mm) activity.

The virus creates an entry in registry to disable “Folder Options” in Windows explorer.
Let us see how we can fix it.

Fix:
In most of the cases, even if the virus is been already removed by your anti-virus program, it doesn’t restore the registry back to the original state. Also anti-virus usually does not delete the registry entry created by the virus.
For restoring the registry settings,follow the steps given below

Enable your folder options in explorer.

1. Go to Start > RUN

2. Type regedit and press enter.

3. Go to HKEY_CURRENT_USER > Software > Microsoft > Windows > CurrentVersion > Policies > Explorer


4. On the right side of the screen, you can see some registry entry names, out of them, right-click on NoFolderOptions and click Modify option.
 
 
5.A new small screen pops up, on this screen, sen the value data field as 0 (zero).Press OK.
That’s it but it requires reboot. Trouble Fixed.

If you don’t want to play with the registry yourself ,you can also download the registry file and double click it to add it to the registry.