If you have a home network and are running Windows 7 and have XP on other PC(s) you might want to share files between them. Today we will look at the steps to share files and hardware devices like a printer.
Sharing Files In Windows 7 and XP
Sharing folders between two Windows 7 machines with the new HomeGroup feature is an easy process, but the HomeGroup feature is not compatible with Vista or XP. For this tutorial we are using Windows 7 x64 RC1 and XP Professional SP3 connected through a basic Linksys home wireless router.
First make sure both machines are members of the same Workgroup which by default is named Workgroup.
On the Windows 7 machine go into Control Panel \ All Control Panel Items \ Network and Sharing Center then click on Change advanced sharing settings.


You will want to verify the following settings under Advanced Sharing Settings for the Home or Work and Public profile.

If you want any user to have access the public shares turn off password protection. This is located in Advanced Sharing Settings toward the bottom of the list.

If you want to keep it enabled make sure there is a log in account for the other XP machines and they have a password.

Now if you go into Network in Windows 7 you should see your XP machine and the Windows 7 as well which in this case is Mysticgeek-PC.

To share the printer on the Windows 7 machine go into Devices and Printers from the Start menu and double click on the printer icon.

Next double click on “Customize your printer”.

In the Properties screen click on the Sharing Tab and check the box to share the printer and type in its share name.

If your XP machine is an x86 OS you can install Additional Drivers before setting up the XP machine.

To find the shared folders and devices double click on the Windows 7 machine icon under Network. Here you can see the printer connected to my Windows 7 machine is shared and also the Users Folder.

Continue into the Users folder and Public to see the shared folders, here I also created a folder called XP Share just to keep everything in central location.

Over on your XP machine open up My Network Places to find the Windows 7 (mysticgeek-pc) shared folder.

Double click on the Share folder to find a list of shared folders in the Public folder on Windows 7. If you have password protection enabled you will need to type in the username and password of the user account on the Windows 7 machine first.
Setup XP With Shared Printer


 Now click Yes to the confirmation message.

Then click Finish the printer to install and complete the Wizard.

In some cases you will need to install the x86 XP drivers for the shared printer because the Windows 7 drivers are not compatible with XP. When everything is installed open up Printers and Faxes to find the shared printer.

This should help you get started with sharing your files and other devices with your Windows 7 machine. When I first started I was able to see the printer on XP right away because I had a HomeGroup set up, but once I deleted it I needed to share the printer like you would for a workgroup. You might also have to do a couple restarts of the XP machine for it to see the shared resources on Windows 7. If you have had any experiences with sharing between Windows 7 and XP leave us a comment!
Sharing Files In Windows 7 and XP
Sharing folders between two Windows 7 machines with the new HomeGroup feature is an easy process, but the HomeGroup feature is not compatible with Vista or XP. For this tutorial we are using Windows 7 x64 RC1 and XP Professional SP3 connected through a basic Linksys home wireless router.
First make sure both machines are members of the same Workgroup which by default is named Workgroup.

On the Windows 7 machine go into Control Panel \ All Control Panel Items \ Network and Sharing Center then click on Change advanced sharing settings.
You will want to verify the following settings under Advanced Sharing Settings for the Home or Work and Public profile.
If you want any user to have access the public shares turn off password protection. This is located in Advanced Sharing Settings toward the bottom of the list.
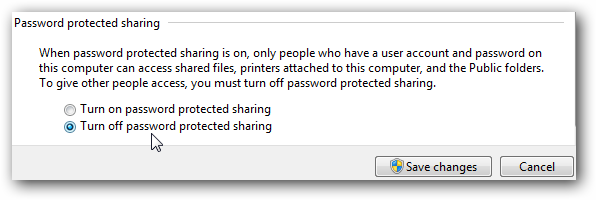
If you want to keep it enabled make sure there is a log in account for the other XP machines and they have a password.
Now if you go into Network in Windows 7 you should see your XP machine and the Windows 7 as well which in this case is Mysticgeek-PC.
To share the printer on the Windows 7 machine go into Devices and Printers from the Start menu and double click on the printer icon.
Next double click on “Customize your printer”.
In the Properties screen click on the Sharing Tab and check the box to share the printer and type in its share name.
If your XP machine is an x86 OS you can install Additional Drivers before setting up the XP machine.
To find the shared folders and devices double click on the Windows 7 machine icon under Network. Here you can see the printer connected to my Windows 7 machine is shared and also the Users Folder.
Continue into the Users folder and Public to see the shared folders, here I also created a folder called XP Share just to keep everything in central location.
Over on your XP machine open up My Network Places to find the Windows 7 (mysticgeek-pc) shared folder.
Double click on the Share folder to find a list of shared folders in the Public folder on Windows 7. If you have password protection enabled you will need to type in the username and password of the user account on the Windows 7 machine first.
Setup XP With Shared Printer
To set up the shared printer in XP you will need to go into Printers and Faxes from the Start menu and kick off the Add Printer Wizard.
Now select “A network printer, or a printer attached to another computer” then hit Next.
Next select “Connect to this printer…” and type in the path for the printer connected to the Windows 7 machine and click next.
Then click Finish the printer to install and complete the Wizard.
In some cases you will need to install the x86 XP drivers for the shared printer because the Windows 7 drivers are not compatible with XP. When everything is installed open up Printers and Faxes to find the shared printer.
This should help you get started with sharing your files and other devices with your Windows 7 machine. When I first started I was able to see the printer on XP right away because I had a HomeGroup set up, but once I deleted it I needed to share the printer like you would for a workgroup. You might also have to do a couple restarts of the XP machine for it to see the shared resources on Windows 7. If you have had any experiences with sharing between Windows 7 and XP leave us a comment!


